google search box

Custom Search

Wednesday, December 30, 2009

Tips on using Glitter


Tips when using Glitter:

  • When using a glue pen, do a small area at a time, so the glue doesn't dry out too quickly.

  • You can also use a glue pen to apply glitter to flowers, stickers or anything else needing a little sparkle.

  • When doing a large area such as a chipboard piece, I often use Modge Podge. You can also rub a glue pad over the surface or use a spray adhesive or other liquid glue.

  • Use a tray or small, flexible paper plate, so that you can easily put it back into the bottle.

  • There are different sizes of glitter - the glitter I used was very fine. If you have a chunky glitter, you would want to use on a much larger, less detailed project.

  • Baby wipes are a great way to clean the tray or help to get the glitter off your hands. They also help with static cling.

  • Use a small paint brush, Q tip or eyeshadow applicator to brush away excess glitter.

  • Did you know that paint is a good adhesive for glitter? Take your paint and then while the paint is still wet, sprinkle glitter right over the top of it. The glitter will stick right to the wet paint. Let the paint dry completely before using it on your project.
  • If anyone else has any other tips feel free to share!

Storing Stickles


I saw this over in THIS thread on 2PEAS: GLITTER STAIRS to store all your Stickles!

Looks like you can buy one HERE; price is $29.99 I heart Stickles which, if you’re not familiar, is a very special type of glitter glue you can use in your scrapbooking and cardmaking. Stickles has a nice pointy tip so they come out in a fine line, and yet the consistency of the “glue” is such that it doesn’t goop up, you just get a nice clean line.
By storing them upside down you avoid clogging and this is a cute way to do it. These Stickles are sold in our store. Click the "store" link on the blog. Happy Creating!

Cook's Helpers laminated cooking guides

Free Download! Martha Stewart "Cook's Helpers" Printables

Sour Cream Sugar Cookies


Yum! Love the holidays when you have an excuse to make cookies :) I normally just buy the sugar cookie mix from Costco which is really good, fast and easy for the kids but this time I These are the best, if I do say so myself. Seriously it's a really good recipe. Try it. :)

Sour Cream Sugar Cookies

1-1/2 cups sugar
2 sticks margarine
1 egg
2 tsp. vanilla
1 cup sour cream
4-1/2 cups flour
1 tsp. baking soda
1/2 tsp. salt

1. Cream together sugar and margarine. Add egg, vanilla, and sour cream. Add dry ingredients. Mix well, but only until flour is incorporated.
2. Refrigerate and shape.
3. Place on lightly greased baking sheet. Bake at 425° for 5 minutes (or longer if they're a bit thicker... just watch the first batch and then adjust the cooking time accordingly).

Also, the icing! It's just Martha's royal icing recipe. See it
here. There's also a video of Martha using the royal icing. Enjoy! :)


Saturday, December 26, 2009

The Night Before Christmas ... for moms

'Twas the night before Christmas, when all through the abode
Only one creature was stirring, and she was cleaning the commode.
The children were finally sleeping all snug in their beds, while
Visions of Nintendo and Barbie flipped through their heads.

The dad was snoring in front of the TV,
With a half-constructed bicycle propped on his knee.
So only Mom heard the reindeer hooves clatter,
Which made her sigh, "Now what is the matter?"

With the toilet bowl brush still clutched in her hand,
She descended the stairs and saw the old man.
He was covered with ashes and soot, which fell with a shrug,
"Oh, great," muttered Mom, "now I have to clean the rug."

"Ho Ho Ho!" cried Santa, "I'm glad you're awake,
your gift was especially difficult to make."
"Thanks, Santa, but all I want is time alone."
"Exactly!" he chuckled, "So, I've made you a clone."

"A clone?" she muttered, "What good is that?"
"Run along, Santa, I've no time for chit chat."
Then out walked the clone - the mother's twin;
Same hair, same eyes, same double chin.

"She'll cook, she'll dust, she'll mop every mess.
You'll relax, take it easy, watch The Young and The Restless."
"Fantastic!" the mom cheered. "My dream has come true!"
"I'll shop, I'll read, I'll sleep a night through!"

From the room above, the youngest did fret.
"Mommy? Come quickly, I'm scared and I'm wet."
The clone replied, "I'm coming, sweetheart."
"Hey," the Mom smiled, "she sure knows her part."

The clone changed the small one and hummed her a tune,
as she bundled the child in a blanket cocoon.
"You're the best mommy ever. I really love you."
The clone smiled and sighed, "And I love you, too."

The mom frowned and said, "Sorry, Santa, no deal.
That's my child's love she is trying to steal."
Smiling wisely, Santa said, "To me it is clear,
Only one loving mother is needed here."

The Mom kissed her child and tucked her in bed.
"Thank you, Santa, for clearing my head.
I sometimes forget, it won't be very long,
when they'll be too old for my cradle and song."

The clock on the mantle began to chime.
Santa whispered to the clone, "It works every time."
With the clone by his side, Santa said, "Good night.
Merry Christmas, dear Mom, you will be all right."

Tuesday, December 22, 2009

Cuttlebug Challenge Coco Idea


This fun set has been created by Shantaie


Instructions are at Cuttlebug challenge here

How to store your Stamps

Hello Everyone! Wanted to share with you another organizing tip:storing stamps. I organized my wood stamps according to theme on these shelves in my office. I bought these at Michaels Craft store using a 40% coupon on each one. It works great because I can visually see what stamps I have. Below the picture is a video on a great way to store your clear stamps. I do exactly what she does in her video so I thought that was cool she did a video on it. Happy Crafting!


Paper Piecing Tutorial

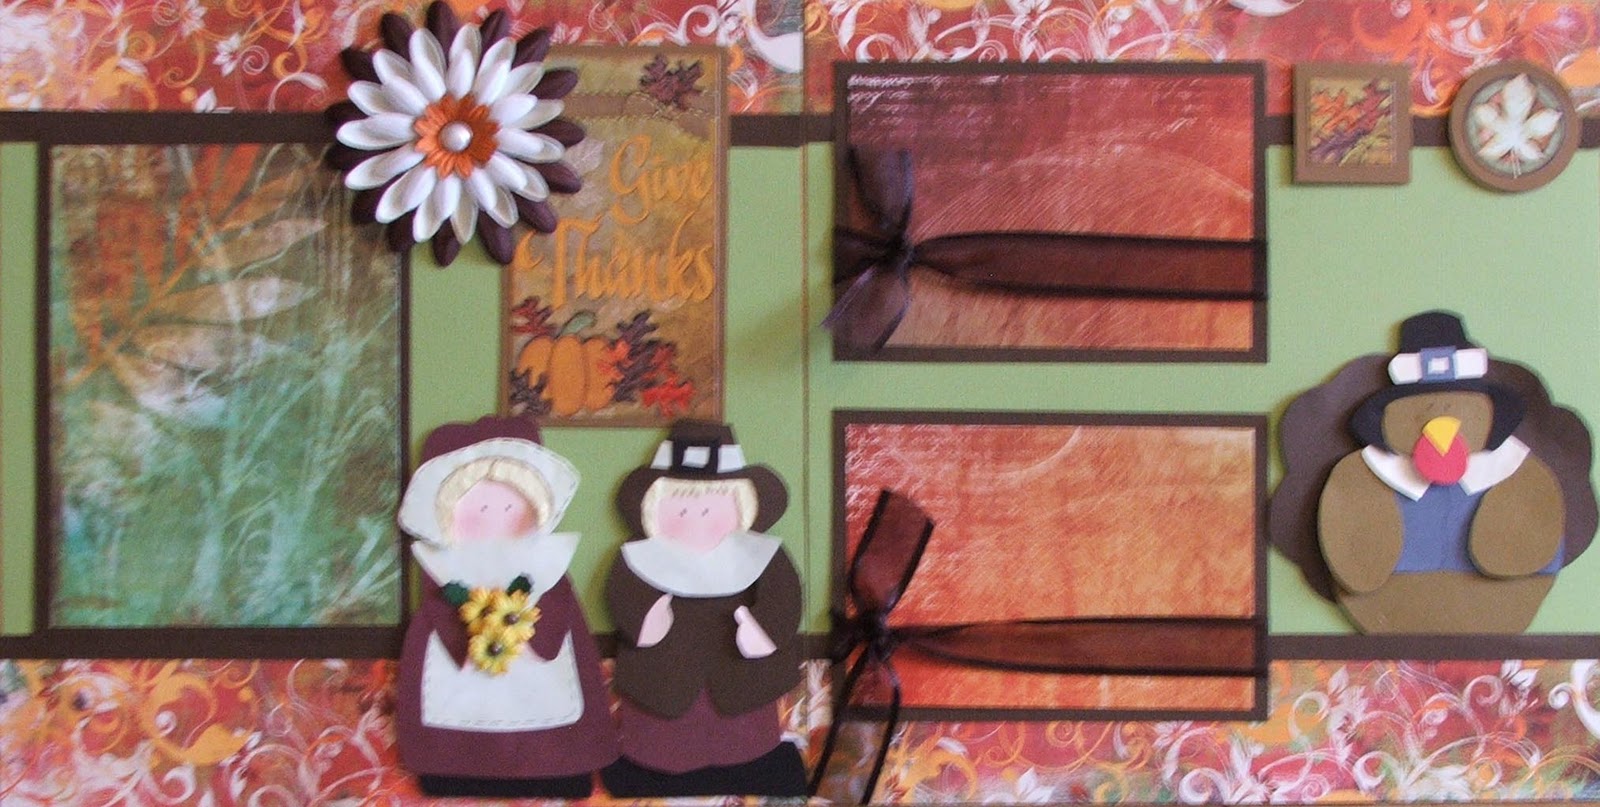
What is Paper Piecing? Paper Piecing is Paper Art, you create an image of something, by cutting out pieces of a pattern and putting or “piecing” them back together using your choice of colors and patterns of paper or cardstock to form the desired object. In a lot of ways, it is like putting together a puzzle. For example, if you have a bear pattern, each arm and leg, the head, the body and so on, would be cut from a separate piece of paper or cardstock. These are then glued together, either onto themselves or your background paper. Then they are detailed with lining (tracing the edges) and chalking (adding color to give it a more detailed look).

Once you have a pattern you want to use, there are a few ways you can use it. You can cut out the individual pieces of the pattern and trace around them onto your paper. Or, you can use your Light Box to trace around the original pattern, then cut out the pieces. Better yet if you own an electronic cutting machine like Cricut (sold in store), Pazzles, Wishblade or CraftRobo machine, you can simply you download your patterns online or use cartridges and it cuts it right for you.

Here is some awesome video tutorials on paper piecing:

http://www.youtube.com/watch?v=DXCEM914o1A

http://www.youtube.com/watch?v=K6u1DQRsChs

http://www.youtube.com/watch?v=3kXdLE-d6gs

http://www.youtube.com/watch?v=Y0fAY4ANU7I

http://www.youtube.com/watch?v=PwfEaAHrt68

Monday, December 21, 2009

Free Poinsettia Svg

All the leaves are the same size. Leaves cut 5 and petals cut 7. The inner dots cut 6. You can also use a hole punch for the inner dots, quick and easy :) Then Use a black pen or colored pencil to draw in veins and trace the edges of both the petals and leaves. Before assembling the pieces, fold the petals in half to give them some dimension.


http://www.mediafire.com/?sharekey=9a64887562a2de45b64026cfc061123602eb9e807b189d284ca8d2a77d7aad89

Christmas Ornament Tag for SCAL

http://www.mediafire.com/?rntl2zobyxz

Free Candy Cane .Cut file


http://www.mediafire.com/?sharekey=9a64887562a2de45b64026cfc061123602eb9e807b189d284ca8d2a77d7aad89

New Cricut Cartridges Preview

Here is the list of new cartridges that will be available in my store soon

Tie The Knot Cricut Cartridge: This one has some beautiful images on it.

TietheKnot New Cricut Cartridges Announced

Heritage Cricut Cartridge:

Heritage New Cricut Cartridges Announced

Sentimentals cricut cartridge:

Sentimentals New Cricut Cartridges Announced

Songbird cricut cartridge:

Songbird New Cricut Cartridges Announced

Forever Young cricut cartridge: I Love the flowers on this one. I am not sure that I would

purchase this one for my collection or not. I guess if I saw projects that inspired me perhaps lol!

ForeverYoung New Cricut Cartridges Announced

I so want this cartridge! There are tags, cards, cupcake holders and party favors.

sweettreatscricutcartridge Sweet Treats Cricut Cartridge Preview

sweettreatscricut Sweet Treats Cricut Cartridge Preview

The preview above does not do this cricut cartridge justice. Please stop over at Diane’s blog, Capadia Designs. She took some awesome picture of the cartridge handbook and you can see for yourself why this will be one cartridge you will want to own! Please visit her blog here. I know that it will be one of my favorites.

This Weeks Joann's Coupon


Here are the coupon for the week for Joanns. Lots and lots of coupons!!!!!! Buy lots of things for you and your cricut!

This Weeks Michaels Coupon

Friday, December 18, 2009

Organizing Scrapbook Paper


Often scrappers ask each other how they store and organize their 12" x 12" paper? I thought I'd share a system that has worked well for me. My collection of pattern papers has become an obsession and I needed a way to organize it so that I would know exactly where to look to find the perfect paper when I was working on a page. I first organized my cardstock by color, and then by the shade of that color. I placed the solid cardstock in Cropper Hopper Vertical 12x12 paper organizers (sold in store) The pattern paper I organize by theme and manufacturer. Costco had these scrapbook tower organizers that can in so handy! LOVE THEM! Your stack of patterned papers may be divided differently than mine, but these categories will give you an idea of how it can be done.
I list most pattern papers by manufacturer and then:
Solid - papers that are mostly solid colors, but are not cardstock
Stripes
Swirls
Dots
Plaid
Stars
Floral -papers with flowers or leaves as the primary design
Realistic - animal prints, wood grain, photographic scenes, etc.
Specialty Paper - mulberry, handmade, velveteen, metallic, etc.
Vellum
Embossed
Disney
Baby
Travel
Holidays

Miscellaneous - anything that doesn't fit in the categories above

Thursday, December 17, 2009

More on the Scrap Room


Whew! So busy last couple of days...Christmas is coming in warp speed! Why is Christmas just like a day at the office? You do all the work and the fat guy with the suit gets all the credit. Hope all of you are keeping warm tonight...I am all wrapped up in a "Snuggie" lol! sippin a cup of Mexican Hot Chocolate. YUMMO!! Before I go crawl in bed for a good book I thought I would share with you some more pictures on how I set up my scrapbook room and ideas for organizing. I purchased my desk from Pottery Barn, the shelves above the desk from Home Depot (holds all my Cricut carts, chipboard embellishments and photos). The white storage boxes I purchased at Walmart. I have binders on my shelves to that are labeled Tutorials, Cutting files, Cricut shortcuts and sheets, Manufacturer info and layout ideas.

Sunday, December 13, 2009

Storing Punches

The far right drawer stores all small and medium sized hand punches. Tomorrow I will post more on how I store cardstock, pattern papers and tools. Happy Scrapping!

Storing Ribon


The middle drawer holds all my loose ribbons. I used ribbon cards
(sold in store) to wrap each one. In my closet I have two Ribbon Embellishment organizers by Making Memories. I used a 50% of coupon at Michaels craft store to buy them :) This is where I store my ribbons on spools.

Storing Small Embellishments


The first drawer hold my embellishments that I use quite often like
brads, eyelets and jump rings. The little plastic containers used
is actually baby food containers :) works out great!

Storing Embossing Supplies and Prima Flowers


The above wall cabinets is what I store all my Prima flower jars, embossing/ paint supplies, mulberry paper for tear bears. My embossing supplies are stored in plastic containers that I purchased from Walmart for 1.00-2.00 each and fit perfectly in the cabinet :)

Setting up your Scrapbook Room and storing supplies


The cabinets and counter top are from the Home Depot. The green paint is also from Home Depot.
The Shelf just above the counter I purchased at
Ikea. Im still in search of the right drawer knobs and pulls ha!


Saturday, December 12, 2009

Christmas Layout Title Ideas


I am starting on a Christmas Layout that I will be posting in the next day or two and thought I would share with you some cute titles for your Christmas layouts that I have collected:

1. Believe in the Magic of Christmas
2. Christmas cookie and Holiday hearts....That's the way the holiday starts
3. Gingerbread boys!
4. Happy Holly-Days!
5. I can "Bearly" wait for Christmas (embellish page with Tear Bears)
6. In Search of the perfect tree
7. Merry Kiss-mis
8. Moo-ey Christmas
9. Santa, PLEASE STOP HERE!
10. Presents & Carols & Lights...Oh My!
11. Santa Express (train or mail theme)
12. Silver Belles (pictures with girls)
13. Tree-Mendous Wishes
14. A Season with a Precious Reason
15. Don't Peak, don't sneak, til' Christmas
16. Cold hands, Warm Hearts
17. Holiday memories warm even the coldest of days!
18. Come & See the Christmas tree!
19. Dear Santa, I've been sooooo good!
20. There's Magic in Believing
Happy Scrapping!

Really cool eyelet ideas

This is a really cool list of ideas for eyelets!
60 Ways to Use Eyelets and Brads:
Connectors on paper piecing for moveable parts
Attaching vellum
Accents on journal blocks
Accent to “hang” things from
Center of flowers
Center of letters
Spell out words (outline letters)
Corners of picture mat
Eyes of paper dolls
Nails in wood or a fence
Earrings for a paper doll
Belly button jewel for a paper doll
“Stone” in a ring
Buttons on a snowman
Decoration on a child’s ball, ornament, or other paper piecings
Stepping stones on a garden layout
Attach a fiber to a brad to make a yo-yo
Attach elements on a page by wrapping wire or fiber
To form “bullets” for a list of things
As an accent on the tail of a letter
In the hole of a tag
White – as stars on a black or navy blue sky
White – as dropping snowflakes
Light blue – as falling raindrops
Orange – as pumpkins
White – as moonbeams
Purple – grapes in a cornucopia
Brown – as chocolate chips on a cookie
Jeweled belt on a paper doll
Toppings on a pizza
M & Ms
Buttons on a shirt or dress
Decorations on an Easter egg
Decorations on a Christmas tree
Lights on top of a police car or fire truck
Center of a pinwheel
Center of tires, toy or real
End of antenna on a bug
Center of fiber spider web
Hair ornament on a girl paper doll
The “dot” on an “i” or “j”
Attach handle to a basket
Lace something together, using fibers here would work
Attach a sign to a post
Rocks
Center of propeller on an airplane
On serendipity squares
Sesame seeds on a bun
Jeweled skirt on a paper doll
Use as a spider with the legs behind it or use wire for it’s legs
Dots on a ladybug
As fillers
Christmas Bulbs on a tree paper piecing
Eye on a frog
Use to embellish the corner of tags or Borders or titles
Attach fabric, twistel, wire, dream string or lace to paper
Use star eyelets for a night sky
Ends of a hammock
On butterfly wings
Oval nail heads as Easter Eggs
Buttons on a dress
Shoe buckle
Sprinkles on an ice cream cone or cupcake
How to Use Eyelets
It is time to roll up those sleeves and break out your handy tools. You will need a hammer, hole setter, and a resilient work surface such as a rubber craft mat to get started using eyelets.
Place your scrapbooking page face up on your work surface.
Put the hole setter on your page where you want to insert the eyelet.
Lightly tap the end of the hole setter a few times until a hole is created.
Place your eyelet upside down on your work surface and put your scrapbooking page over the eyelet so that the back of the eyelet sticks throught the hole you just created.
Place the setter with the flat end over the back of the eyelet and lightly tap the end of the setter with your hammer until the back of the eyelet begins to bend outward.
Hammer the back of the eyelet directly until the eyelet flattens down into place.
Turn your scrapbooking page over and be proud of your work

101 Ribbon Uses

1. Cut a journaling block into horizontal strips. Tie a ribbon in a bow or knot to the left end of the first strip, then the right end of the second strip, and so on.
2. Create a page frame by stitching ribbon to each side of the page, then cover the joins with a button or another accent. 3. Collect scraps of ribbon and cover the spiral binding of a journal or album in bows.
4. Tie a bow on a paperclip.
5. Soften the look of metal mesh by knotting satin ribbons through the latticework.
6. Colourblock a layout, punch holes where the blocks meet and lace with ribbon.
7. Create a ribbon loop off the side of the page, securing with stitches or staples, to index sections in your album.
8. Stamp tiny tags with a single letter and use narrow ribbons to attach to your page for a quirky title.
9. Hold a bookplate in place by securing each side with a length of ribbon, fixing the ribbons onto the back of your layout.
10. Punch holes along one side of a photo or mat and finish with ribbons tied in loop knots.
11. Loop ribbon around one side of a metal frame, then tie with a tiny knot or bow.
12. Laminate a leaf or another found object, punch a hole and tie on a ribbon.
13. Dye ribbons to match anything perfectly.
14. Criss-cross two lengths of ribbon to create a pocket.
15. Turn bows on their side and place at either end of a title.
16. Stamp a name or date on a ribbon, fold around the corner of a photograph and secure with a paperclip.
17. Use ribbon to hang a locket holding something special.
18. Thread two metal rings onto a length of ribbon and secure them both in a loop at one end (you can use an eyelet, nail head, brad, stitches or staples to close the loop). Wrap around a journal, mini book or photo mat and pull the loose end of the ribbon through the rings, just like a belt.
19. Make a masculine tag by threading a plain washer onto a ribbon remnant, folding in half and stapling to the top of a tag.
20. Hide journaling or an additional photograph on your page. Using self-adhesive ribbon as a hinge, secure just one side of a cardstock block to the background.
21. Cover the join between two patterned papers with a length of ribbon.
22. Create a collage between two microscope slides or pieces of transparency, then tie ribbon around the glass sandwich.
23. Team up ribbon with anything else from the haberdashery section: ric-rac, upholstery trim, lace, fibers, snap trim, zips, elastic or a hook and eye set.
24. Layer a brightly coloured sheer ribbon over traditional black and white gingham to create a custom coloured gingham.
25. Stick ribbon over vellum to hide adhesive.
26. Make a flower with loops of ribbon plus a button in the middle.
27. Cover the edge of a border of patterned page with three inch lengths of mismatched ribbons.
28. Use letter stamps on ribbon for journaling or captions.
29. Use ric-rac as the stem for a flower accent.
30. Run a thread through a length of ribbon, making loose stitches, then pull the ribbon together to gather.
31. Apply rub-on letters to a twelve inch strip of ribbon to make a custom border.
32. Cover a scrap of cardstock with ribbon scraps in lines, then place a cut out shape over the top so the quilted design shows through.
33. Fray ribbon scraps, then overlap and sew to the page.
34. Place a ribbon in a tiny glass charm for a message in a bottle look.
35. Weave your ribbbons in big or little sections on your page.
36. Punch holes on one side of a photo mat, then lace the ribbon through and add a charm to one of the loops.
37. Make one long loop of ribbon around an entire page, then use shorter ribbons to tie knots and bows to that ribbon.
38. Make a bulletin board look by criss-crossing ribbons across the page and joining with brads or buttons.
39. Use frilly ribbons with rustic elements, mixing girly trims with twill tape or a wooden tag.
40. Create your journaling in widely spaced rows. Punch small holes around key words and thread ribbon through to box out or underline words with colour.
41. Hang a letter charm from ribbon and wrap around the bottom third of a photo.
42. Use a variety of green ribbons in short, overlapped lengths to represent grass for a summery layout.
43. Place your title and journaling blocks on your layout, then cut slits at the top and bottom. Run sheer ribbon through to ‘hold’ the blocks in place.
44. Spell a title by threading letter charms onto a longer length of ribbon, adding a knot between each letter.
45. Cut a variety of ribbons to six to eight inch lengths. Adhere at odd angles to the bottom of a double page layout, with the photos and accents above this border.
46. Place short lengths of ribbon over the four corners of a photo and secure in place with brads.
47. Place ribbons around the edge of a large circle shape.
48. Fold ribbon scraps in half and staple to one side of a photo mat.
49. Use a wide ribbon as you would a strip of patterned paper.
50. Stitch your ribbon with a zig-zag.
51. Thread silk or paper flowers onto ribbons to create a daisy chain.
52. Use polka-dot ribbon with striped patterned papers.
53. Tie a series of bows or knots to cover a length of wire, then attach the wire by punch two tiny holes in your page and threading it through to the back.
54. Run a simple border with one thin ribbon across the top of your page and two thin ribbons at the bottom.
55. Tie a group of tags together with brightly coloured ribbons.
56. Punch small holes and thread a border like you would lace your shoes.
57. Use sheer green ribbons to represent leaves on flowers.
58. Use your ribbons in vertical strips instead of horizontal.
59. Repeat just one ribbon pattern throughout your layout.
60. Hang tiny jingle bells on a Christmas page.
61. Select two ribbons of contrasting colour. Attach one to the left side of the page and the other to the right, then tie together in the middle. Repeat in the opposite colours to make a criss-cross if you wish.
62. Get out your eyelets and add to a paper accent, like a monogram letter. Thread ribbon through and tie in a knot.
63. Pin a safety pin through a bow or knot.
64. Tie a ribbon around the stem of any letter in your title.
65. Allow ribbons to come out the top of your {top-loading} page protector.
66. Place one bold strip of a patterned paper on your cardstock background. Add an angled strip of a colour-coordinated ribbon. Add an accent near where the two meet, and place the body of your layout in the remaining gap.
67. Punch or cut several small squares or circles. Punch a small hole and tie a ribbon on each, then line up for a border.
68. Line up several lengths of the same ribbon and secure the ends with brads, then place your title on top.
69. Punch a group of holes in any preprinted accent and add ribbons to make it your own.
70. Create a bold frame using short ribbon scraps around all four sides of the page.
71. Have just the ends of flat ribbons appear from one side of a photograph. Stick them directly to the page.
72. Use a series of ribbon-trimmed metal-rimmed tags to journal in list form.
73. Repeatedly wrap a ribbon around a block of cardstock, then tie with a charm, tag or stamped image.
74. Use only black and white ribbons plus one colour of cardstock.
75. Stick ribbon directly to the page and cover the ends with square or round accents.
76. Place several twelve inch lengths of ribbon to the page, leaving an inch gap in between. Number the lines of ribbon and add journaling for a ‘# of things I…’ layout.
77. Tie ribbons on bobby pins/hair grips and slide onto the edge of a photo.
78. Use ribbon inside a slide frame or book plate.
79. Create a pull tab with a loop of ribbon on a tucked away photo or tag.
80. Use just ginghams!
81. Attach tiny clothes pegs to a length of ribbon.
82. Use white sheer ribbons for angel wings.
83. Thread white letter beads onto ribbons for journaling.
84. Tie ribbons through button holes and tie on the top.
85. Attach pins or badges to a length of ribbon stuck straight to the background.
86. Put your title inside a circle frame, and hold it in place with ribbons on two or more sides. Tuck the ribbons over to the back of the page.
87. Thread on a buckle for a classy accent.
88. Spice up a simple layout with just three knots of ribbon near the corner of a the photo.
89. Create a pinwheel design by sticking down bright ribbons cut with an angle at the end.
90. Fold your ribbon in half then cut at an angle to get that little V at the end.
91. Instead of peeling your stickers from the backing, cut them out and treat like regular paper. Punch a hole, tie a ribbon and look at your sticker in a new way.
92. Create a layout with three blocks of cardstock, then hang multiple ribbons from the bottom of each block.
93. Make a summery layout with mismatched ribbons placed 3/4 of the way down one side, to mimic flags on a sail boat.
94. Make a mini book to hold extra photos and journaling, and make sure the sides wrap around to the front so the covers open to both the left and right. Secure ribbon on the back and tie on the front to close.
95. Thread circles on ribbons to mimic Christmas ornaments, then tuck the ribbons around the top of the page and secure on the back. Design the layout on top of the ornament background.
96. Make it simple: stick a length of ribbon directly to the cardstock. Tie a bow and stick it on top — an easier way to make everything stay put.
97. Create your title with letters on individual blocks of cardstock, then thread together by punching holes and tying together with ribbons.
98. Use watermark ink to customise your ribbon with a design or phrase.
99. Make curly ribbons by wrapping tightly around a dowel rod or pencil (securing with pins if needed), spraying with corn starch and baking in the oven for about five minutes. Leave to cool and set over night, then remove from the dowel. Great for album covers and bindings.
100. Use ribbon to bind a small book of index prints on your layout, then add more ribbon to close or hang the book.
101. Grab your favourite ribbon of the moment and work your entire layout around that inspiration. Print your photos in black and white so you don’t have to worry about colour clashes and just have fun.
Attaching Ribbon to a Page
Mini Glue Dots™ are an excellent method of securing ribbon to paper–especially bows and knotted ribbon. The key is the size of the Glue Dot™ that you use. The Mini size is big enough to secure the ribbon, but small enough so that it does not seep out from behind the ribbon and stick to the sheet protector.
Mini Glue Dots™ are also great for adhering strips of ribbon to your paper, but so are brads and eyelets. Just pull your ribbon taut and punch a hole through your ribbon and your paper, then place a brad or eyelet in the punched hole and secure. Other adhesives that work well for ribbon strips are glue sticks and double sided mounting tabs.
What to Do About Fraying Ribbon?
Trimming the ends of the ribbon tails at an angle will keep the ribbon from fraying. You can simply cut the end of the tail at a straight angle, or cut an inverted “V” into the end for a refined look.
Tying a Shoestring Bow
It’s just like tying a shoelace! To create a shoestring bow:
Take one end of a ribbon length and fold it over, creating a loop.
Wrap the other end of the ribbon loosely around the center of the loop, then form a loop in the free end of the ribbon and push it through the center of the ribbon.
Pull the loops in opposite directions to tighten the bow and trim the tails at an angle.
If you find it difficult to tie a shoestring bow, consider knotting the center of a short length of ribbon instead. This gives a bow tie look and is also an excellent use for ribbon that is too short for making a bow. The knot can be attached to the page with a Glue Dot™.

Tips on Using Buttons in Scrapbooking

Buttons are not just for clothing. It’s unclear when scrapbooking with buttons began as a trend. Even in early scrapbook albums, it wasn’t unusual to see a button placed on a scrapbooking page. Quite often it was a keepsake button, like from a vintage piece of clothing or a baby girl’s first dress. As scrapbooking pages started to become more 3-D and scrappers looked for unique embellishments for their pages, buttons became more popular. Manufacturers started offering buttons to coordinate with their paper lines, and buttons with themes like Christmas and sports became available. Monthly scrapbooking kits and page kits often include complementary buttons as part of their packages. Consider these tips for scrapbooking buttons on your pages.
1. Buttons lined up together can make a border for your scrapbooking page layouts.
2. Place buttons in your titles by using them to dot your “i”s. You can also use them as the center of letters like “o” and “p.”
3. Buttons can be secured to a page using embroidery floss by sewing it into the page.
4. Glue dots work very well to adhere larger-sized buttons to a page, as well as buttons that are not flat on the bottom.
5. A few buttons make nice accents to anchor a ribbon border to a page. Again, glue dots will securely attach the buttons to the ribbon.
6. Try placing a button on the flap of an envelope to decorate a simple page element.
7. Flowers are still very popular on scrapbooking pages. Silk or paper flowers come in all sizes and colors now. A button makes a perfect center for a flower. An added benefit is that the button can hide the adhesive that typically shows through a paper flower.
8. Take 4 small buttons and attach them to the 4 corners of a photograph. The buttons will look like they are holding the photo to the page.
9. Create a bulleted list for journaling. Use buttons as the bullets.
10. Scrapbooking tags can be used for page elements, photo mats, and journaling blocks on a scrapbooking page. You can use a button to decorate the hole at the top of a tag.
11. Try placing a button on a page and then hanging the string from a scrapbooking tag from it as an anchor.
12. An antique, vintage or unusual button can be used individually on a page as a page element all its own. Try double matting the button to highlight it on your layout.
13. Attach a button to a page with the holes empty, or thread some floss through the holes and tie it in a knot or bow for an added accent.
14. Don’t limit yourself to one size of buttons on your page layout. Mix sizes and styles of buttons. You could stay with the same color, but have a variety of different buttons in that same color on a single page.
15. Buttons can be memorabilia. Save buttons from shirts, handbags, hats and other clothing that have sentimental value, but that you no longer can use. The buttons can be added to a scrapbooking page to remember the times when you wore those items. Baby buttons look cute on a baby page layout as well.

Friday, December 11, 2009

The Basic Essential Tools For Scrapbooking

Since I am starting from the beginning on blogging I thought I would get to the beginning basics on what I think is the "Must have" Scrapbook essentials:

Necessary Scrap Tools
12 inch paper trimmer
Cutterbee Retractable Knife
A sharp scissors – like cutterbee
Colored cardstock -a good selection will have at least 4 sheets of each basic color. solid cardstock colors in shades you know you will use. Browns, blues, white, off white, black, and grass green.
• Patterned papers - I would buy patterned papers as you go and not stockpile as much. These become 'dated' quickly
black Zig Writer
white gel uniball pen
oval and circle template cutter
Adhesives-- photo squares. I do not recommend glue sticks (they dehydrate over time) or super wet liquid glues for photos. Liquids soak into backing paper and causes warping if you use too much. Tombo liquid glue is what I really recommend for paper piecing and tear bears.
Red Eye pen
Ruler
Cricut machine
Scal software
Oval hand punch
Corner rounder punches small medium and large
• Decorative scissors-
deckle, scallop and pinking- everyone's favorite decorative scissors. The classics!
• Fibers if you like them. Start simple with one multi colored pack.
Big eyed needle for sewing fibers, poking holes, etc.
Glue dots are good for lumpy embellishments and fibers
Chalk
• Makeup applicators or Q tips for chalks
• Gold, silver, white and black brads
Eyelets in primary colors
• Eyelet setter like crop-a-dile from we r memory keepers
• Embosser
• Glue Gun
• Sew mini by janome
• Cuttlebug
• Color wheel

Wednesday, December 9, 2009

So glad to finally finish mailing our Christmas Cards out today. Here is the final picture I chose for the cards (my two little blessings) my sons Ian and Jayden. Now you know what I need to do right? Shop for the perfect scrapbook paper for a layout for this lol! Do you do what I do....pick out scrapbook paper then find kids clothes to match and vice versa? I guess you know when you a true scrap addict!

Tuesday, December 8, 2009

YAY ME!!

I now have a blog!....I am so~o 21st century LOL! Well, Hello to all of you out there in blogosphere land I hope that if you chance to visit my blog, I hope you enjoy it. Please become a follower if you like or share your comments. Here I plan to share with you my tips and tutorials of scrapbooking, paper piecing, tear bear art and card making. I will also be posting free SVG files for your cutting machines so stay tuned!