
Welcome!
We're so excited to be doing this hop and we have a fabulous lineup with some very talented ladies. There will be lots of fun projects, along with some great blog candy, and a great grand prize for this hop.
The hop is a 2 day hop so you will have plenty of time to make it through the whole hop lineup twice. Check out each blog and see what blog candy you can win at the individual stops. Please come back both days to see great projects.
Here is the complete lineup:
Janet http://createatdreamscrapbooks.blogspot.com ---> You are HEREChristina http://cema1cema.blogspot.comScrappin http://scrappindhilly.blogspot.com/Jearise http://lorbysworld.blogspot.com/Susan http://susanascorner.blogspot.com/
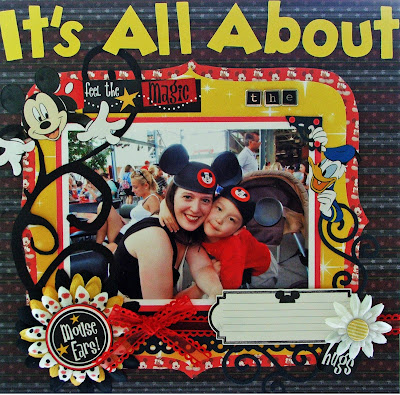
I want to thank you so much for the wonderful feedback and comments you have left on my blog and for becoming followers =D I hope this hop has given you lots of ideas and inspiration. Here is my project for today...I made another "All About the Ears" layout with my son and my honey =D I used a large Mickey head punch, Queen and Company paper, brads and title. I used a star die by Sizzix
 thank you so much for taking a peak!
There is going to be an overall grand prize sponsored by Lisa from Scrapping with Lisa and she will be the first and last stop in the lineup. In order to qualify for the grand prize, you must leave a comment on every stop in the hop, including my facebook page. You also must become a follower of my blog and of Scrapping With Lisa on facebook. The grand prize for the blog hop is a nice grab bag full of goodies. You won't be disappointed in this prize.I am offering a blog candy giveaway that I will post this evening through random.org and to be eligible to win please be a follower of my blog if you are not already and please leave a comment on this hop and I will be drawing for a lucky random winner =D I also have a facebook fanpage and would love you would come over there and "like" my page and stay in touch! Here is my fanpage: HERE
Here is the blog candy: 1 EK Success pack of Disney ribbon sliders on left and a pack of EK Success Mickey photo corners
Your next stop is Christina's Blog to see what amazing project she has for you to see! Thank you so much for hopping by my blog on this hop and I hope you will stop on by often! Happy Creating!

google search box

Custom Search


Showing posts with label Disney Layouts. Show all posts
Showing posts with label Disney Layouts. Show all posts
Friday, September 30, 2011
Mickey and Friends Blog Hop Sept. 29th-30th


Wednesday, September 28, 2011
Mickey and Friends Blog Hop Sept. 29th-30th
Welcome!
We're so excited to be doing this hop and we have a fabulous lineup with some very talented ladies. There will be lots of fun projects, along with some great blog candy, and a great grand prize for this hop.
The hop is a 2 day hop so you will have plenty of time to make it through the whole hop lineup twice. Check out each blog and see what blog candy you can win at the individual stops. Please come back both days to see great projects.
Here is the complete lineup:
Janet http://createatdreamscrapbooks.blogspot.com ---> You are HEREChristina http://cema1cema.blogspot.comScrappin http://scrappindhilly.blogspot.com/Jearise http://lorbysworld.blogspot.com/
Here is my Disney layout I have to share with you today! For the title "It's All About" I cut using my Cricut machine with the Disney and Friends Cricut Cartridge. The papers are from Queen and Company and the Disney Stickers are from Creative Imaginations
thank you so much for taking a peak!
There is going to be an overall grand prize sponsored by Lisa from Scrapping with Lisa and she will be the first and last stop in the lineup. In order to qualify for the grand prize, you must leave a comment on every stop in the hop, including my facebook page. You also must become a follower of my blog and of Scrapping With Lisa on facebook. The grand prize for the blog hop is a nice grab bag full of goodies. You won't be disappointed in this prize.
I will be posting a blog candy giveaway on my tomorrow's blog hop post so stay tuned...to be eligible to win please be a follower of my blog if you are not already and please leave a comment on this hop and I will be drawing for a lucky random winner =D I also have a facebook fanpage and would love you would come over there and "like" my page and stay in touch! Here is my fanpage: HERE
Your next stop is Christina's Blog to see what amazing project she has for you to see! Thank you so much for hopping by my blog and hope to see you again tomorrow!

Saturday, April 2, 2011
Digital Scrapbooking Basics #1Tutorial
ok everyone...I was going to walk you through part 1 of digital scrapbooking =D If you want to go along with me I am going to use this free Digital Disney paper kit that you can download right here: http://noreimerreason.com/?p=1
opening the digital file: Once you have downloaded your zip file and have extracted it to a designated folder....open your photoshop elements and select NEW--->BLANK FILE then a window will pop up to give your layout a file name...and to enter size so go ahead and put width as 12 inches and height 12 inches...make sure your resolution field has (300) pixels...RGB Color and background white...

On the left side of your screen in Photoshop you’ll see a set of icons. Each of these represents a tool available to you in PSE. This section is referred to as the Tools Palette. On the right side of the screen is the Layers Palette. At the top of the screen is your main menu (File, Edit, etc.) and just below it is the Options Toolbar.

NOTE CLICK ON THE SCREEN IMAGES TO MAKE BIGGER FOR VIEWING =D
now with our blank canvas go to OPEN and go to your designated folder with the kit...I am using the yellow paper as the first file I
am opening for the background on my layout. Go ahead and also choose the other papers from the kit.

You will notice at the bottom of your screen is the "photo bin" and there is all the opened papers there.

So now with my blank white "New Untitled Document" I am going to take my mouse and click on the yellow paper in my photo bin and drag it right onto the white untiled document.
So now I have this on my Untiled page...go ahead and "Save As" and create a file name for your new digital layout.

I just opened a photo of my boys with Mickey that I will be using along with the "png"file of Little Scraps of Heavens bear with Mickey hat
Now I want to add some of the pattern papers onto my layout and cut them into strips to lay across the layout. I am going to use the grunge black paper first as my mat for the border strips. So go to your photo bin and click on this black paper.
Go to your "crop tool" shown on the left side where the "tools palette" is
and cut a section out of this paper.

Click back on our yellow background layout we are working on and down in my "photo bin" it shows the strip of the paper I just cropped...I took my mouse and clicked on it in the bin and dragged it onto my 12x12 yellow background...

sometimes you may not see what you just dragged onto your layout...it may be hidden behind the yellow paper so if you look to your right in the "layers palette" you will see that you did put it there and it is a layer. Click on that strip in the layers palette...it will show in your 12x12 background a dashed outline of where its hiding =D This dashed line indicating where the edges of the photo are. This is called the bounding box.

Right click your mouse and a little window pops up choose the "bring to front" and there it is =D
Now let's go to the striped red and black pattern paper and we are going to cut a 12" strip of it...using your crop tool...lets cut it out like this

I then used my mouse to rotate my strip so that it lays across the middle of my paper...

I went ahead and cropped some more 12 inch strips of the other papers in this free kit and rotated them and now it looks like this =D

If everyone is still with me..I will go ahead and put a frame, my picture, the piecing and some elements to dress up the page =D
Ok so now I had open my picture of my boys I wanted to use in my "photo bin" and I just used my mouse to drag it onto my 12x12 background that i am working on in photoshop elements. Again I had to look to the right in my "layers palette" to see that my picture I dragged was there because it was hiding on my layout...so I clicked on the picture in the layers palette and it showed a dotted outline of where its hiding...I right click my mouse and "bring to front" =D
I then added the journaling tag in this kit and the frame over my picture sizing it to fit. The "lets remember the magic" was also free in this kit and I just dragged it on my journaling tag and sized it to fit. I found some cute elements in another free kit that you can download here: http://www.4shared.com/file/k7

The paper piecing is the "finished piecing png" file that comes as a file along with the cutting files purchased in this set. The set is from Little Scrap of Heaven "Clubhouse Gang Collection" and you can find it HERE

Now that you have finished your digital layout a good website to print your finished 12x12 digital layouts with excellent quality and 5.00 flat rate shipping and a cost of 1.99 per 12x12 take a look here:
Also Costcophotocenter.com take a look at their site HERE now prints 12x12 scrapbook layouts and it is 2.99 per page =D some Costco stores do this too so check with on near you.
NOTE: Prior to printing your page, you’ll want to save a flattened version. Go to Layer-> Flatten Image. Flattening the image combines all your layers into one.
Tuesday, August 10, 2010
Disney Buzz Lightyear Ranger Spin Layout
Another layout done from our Disney World trip we took a few months ago. Here I only had two photos and the main photo of my little guy Jayden was slightly blury and you couldn't even see him behind that Astro Blaster lol! I still wanted to scrap the ride for his scrapbook though since this was a HIGHLIGHT of the park for him. I made up for it with fun embellishments =D


Layout Recipe:
We R Memory: sewn cardstock-blueberry
Jenni Bowlin pattern paper: Sunny Day
Sassafras border stickers- Apple Flag banners
K and Company- Adhesive stickers- Girl Scout
Little Yellow Bicycle - 12 month cards **used one to look like a target** I then used a 1 inch paper punch for the center red target spot
The Buzz lightyear paper piecing I purchased last week on Ebay =D
Tuesday, August 3, 2010
Disney Character Breakfast with Pooh Layout

Here is a layout I just finished today =D Another one of our Crystal Palace Character breakfast with Pooh and Friends at Walt Disney World. We were there a month ago and we had such a blast!!!!
Products used for this layout:
1) Creating Keepsakes Pooh papers
2)Making Memories brads
3) Prima flowers
4) Pooh piecing, the Pooh title and beehive in the top left were done with the Pooh and Friends Cricut Cart
5) The memories title is a 3D embellishment by Me and My Big Ideas (I have 3 in stock that I will list in my Webstore)
6) The other bee hive and the bees were made from Sizzix dies
Monday, August 2, 2010
Character Breakfast Tigger Layout

The boys LOVED this character breakfast and the Mickey shaped waffles were a hit!!! All the 100 Acre Wood friends were there— Pooh, Eeyore, Piglet, and Tigger! Crystal Palace is a buffet restaurant in a stunning location: a building in the middle of the Magic Kingdom resembling England’s Crystal Palace, which was erected in Hyde Park to house the Great Exhibition of 1851.
In this layout:
1. Background paper used: Creating Keepsakes Tigger
2. Used the cricut cart Pooh and friends to make the tigger title and piecing
3. Sizzix dies for the flowers
4. Queen and Co. brads
Subscribe to:
Posts (Atom)